Pocket Pages with Xyron and Simple Stories

Tuesday, June 30, 2015

I love making pocket pages. They are so quick and easy to make if you've got the right products on hand!

Today I've got a fun one featuring my daughter Rachel. She is a new driver and I made a page celebrating this new accomplishment.

I used some great products from Xyron too! And the beautiful paper that I used is from the Simple Stories "So Fancy" collection!

Keep reading to see photos and a fun tutorial full of tips to help you use the new Xyron Creative Station and 3" Sticker Maker.


Here are some quick and easy tips to make your pocket pages:

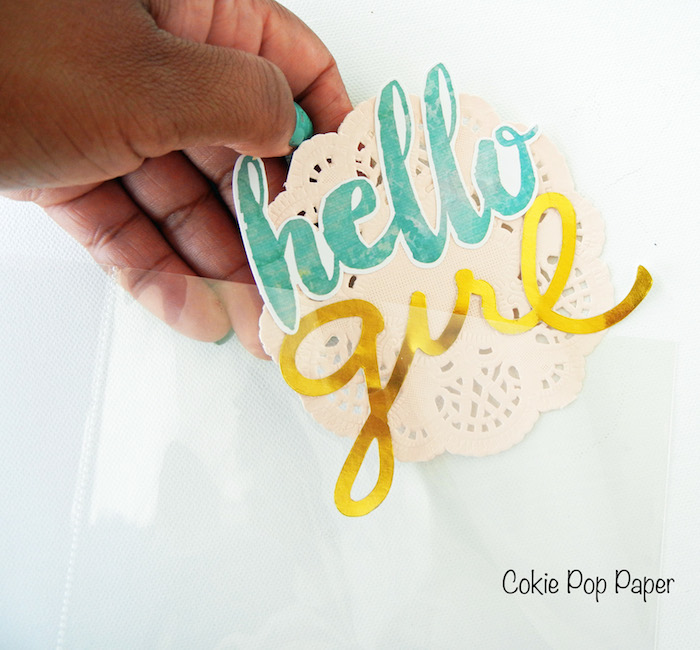
Sometimes the contents of my pockets fall out. To prevent this I ran my doily through the Xyron Creative Station. The adhesive is great to help keep items secure when making pocket pages.


I also used Xyron's 3" Sticker Maker to dress up my doily a bit. This Simple Stories collection comes with loads of die cuts. I ran the "girl" die cut through, removed the film, and placed it on my doily.


I then added a sticker and placed it into one of the pockets.


I went on to use the Xyron 3" Sticker Maker to add adhesive to complete my pocket page. After I cut my paper down to fit into the pockets, they were run through the Xyron to add adhesive.

I also did this with more of the die cuts. You can even place two in at a time. This makes for quick and easy scrapbooking.


Be sure to check out the beautiful "So Fancy" collection from Simple Stories.


And the new Xyron Creative Station is now in all Jo-Ann's stores.  It will be available at Michael's next month and Hobby Lobby in September.


SRM Stickers Instagram Album & Fun News

Monday, June 29, 2015

There are some craft companies out there that I just LOVE

SRM Stickers is one of them! Besides having great products, the leader of this company is the SWEETEST

Yep, I'm talking about Susan McShirley. And guess what she did? She formed an all-star team for the 2015-2016 term. This group is made up of past design team members who are big fans of SRM Stickers. 

And guess what? I was selected to be a part of this team! Woo Hoo!
Some of my FAVE crafty friends will join me. 

To see the full 2015-2016 team head on over to the SRM Blog Here!


And now I've just got to show you a fun way to use your SRM Stickers. I often use them on my Project Life spreads, but this time I've made a fun Instagram album. 

Here's what I came up with...


Photography is a hobby of mine and I fill my Instagram account
 with loads of photos.  

See the "yellow June sticker"? It's from SRM Stickers.  They make colorful stickers that can coordinate with your photos and embellishments.


And I love that they have stickers for all seasons! I used a springtime themed sticker for this page of my mom and I.


And one of my fave stickers are the Sticker Stitches.  I used them to adorn the left side of my Project Life Card. So fun! 

The card, stickers, and photo of Rachel and her Papa go so well together!


And here I've mixed SRM Stickers and Heidi Swapp Project Life
goodies.  It adds some extra fun to the page!


I used We-R-Memory Keepers Instagram album for this project. It's a cute 4" x 4" size and comes in a variety of colors. They are a great size for gifting too!


These are the fun SRM products that I used:

We've Got Your Sticker Hello - #53002
Sticker Sentiments Spring - #51010
Baby's First Year Girl - #48092
Sticker Stitches - Black


Don't forget to stop by the SRM blog to see the new team!

And you can shop for SRM products HERE!

A Crafty Celebrations Fiesta!

Thursday, June 25, 2015

It's time to celebrate! The weekend is almost here! 

Let's get this party started right with some fun "Celebrate" party bags.  I used loads of crafty goodies from Richard Garay's Celebrations line of products too.

Here's what I came up with!


This large design was made with the Celebrate Plate die. I love this one because it's just the right size to cover the front of my bags. 

The design is fun and festive for parties too!


 I also added a paper ring to the inside of the bag using the Fun-Filled Rings die

And everybody is a superstar right? The star was made using the Pierced Stars die.


The dies and the bright and colorful card stock in this collection are so fun to use. 

You can shop this collection on the Spellbinders site HERE!

I hope you all have a HAPPY weekend!

A Crafty Way to Dress Up Your Ikea Plants

Monday, June 22, 2015


I love Ikea plants. I have them all over my classroom. I really love to "dress up them" up to make the room more colorful. My students really love when I do this too!

My latest decor idea came about when I learned how to color with Copic markers. My crafty friend Covondra was sweet enough to give me a coloring lesson a couple of weeks ago. This is the result!


Isn't she the cutest? Her name is Charlotte. This digital image is from The Greeting Farm. I had so much fun coloring her!

And this is what I did to make my decor project. I used the new Xyron Creative Station and DCWV Chick Chat stack. This pack comes with both burlap and paper. 

The Creative Station can adhere more than just paper. It provided enough adhesive for me to even use strong material such as burlap.


I love that there is a cutter already built into the Creative Station. It makes it easy to just slide your blade across and cut off the piece that you need.


And look at all of the adhesive that coated the back of the burlap.


I taped two lollipop sticks to the back of my creation and simply stuck it into the Ikea plant. You can find these sticks at Michael's. They are so fun to use for a variety of projects.

Here's my plant decor in action!


I'm going to make more of these for sure! And the new Xyron Creative Station is now at JoAnn's. 

It will also be in all Michael's stores in July and Hobby Lobby in September. Hope you will give it a try. It's so fun to use!

Gift Bag Tutorial with Xyron and DCWV

Saturday, June 20, 2015

Just call me "The Gift Whisperer"! I am constantly dressing up plain gift bags and boxes.

Take this one for instance! I prettied it up using fun products from both Xyron and DCWV!


First I started with the DCWV Projects Stencils & Flowers packs. These are new stacks that can make numerous projects.

I also used the new Xyron Creative Station and the Xyron Sticker Maker.


There are several steps needed to recreate my gift bag. First, I placed one of the DCWV stencils over white cardstock. I sprayed it with Heidi Swapp's Gold Color Shine. Set it aside to dry. 


Next, I cut the DCWV patterned paper to fit over the front of my kraft bag.


I then used the DCWV Flower Stack. Use the "cut #1" petal template. Cut out two flowers.


After the stencil dries cut the top piece off and run it through the Xyron sticker maker. Wrap that piece around the top of your kraft bag.


Next, run your DCWV patterned paper and a doily through the Xyron Creative Station. Peel off the backing and adhere both to the front of your bag. 


I then used a mini clothespin to add a Project Life card on top of the doily.


Now it's time to add your flowers. Be sure to only run one of your DCWV flowers through the Xyron Sticker Maker. The other will be placed on top using a pop dot. Add a shiny gem to the center of your flower.


Now you are all done and ready to make someone smile!

Don'tcha just love handmade gifting?


To learn more about the DCWV Stencil and Flowers stack click HERE!

And did you know that the new Xyron Creative Station is now available at JoAnn's?

It will also be available at these retailers very soon!

Michael's Craft Store - July
Hobby Lobby - September


Supplies:
Xyron Creative Station
Xyron Sticker Maker
DCWV Stencils and Flowers Stack
Project Life Card - Baby Edition - For Him
White Cardstock - Bazzill
Misc. - Doily, Gem, Mini Clothespin

Project Life - My Fave Kit!

Friday, June 19, 2015

If you follow me on my Instagram account then you know that I love to share my Project Life spreads and ideas over there.

I love to sit at my craft table (with a cuppa coffee) and come up with different ways to pull everything together.


I tried something different with this one. I only used one photo and used more elements from the kit. 

I also left more white space. This made the colors really pop!

I didn't add any extra embellishments! There was no need to because this kit is fabulous when used all alone!


My next spread only used two photos. I'm documenting my fun times with the Houston Insta-Sistas. We all met through Instagram and meet up several times a year for lunch! #funtimes

Which Project Life kit did I use?

This FABULOUS kit is called "September Skies". I found this one at Hobby Lobby and used my handy dandy coupon!


It's from Heidi Swapp and contains foil cards, acetate cards, acetate ephemera, and paper ephemera. 


The combination of foil, acetate and paper makes for pretty pages. This kit is one of my FAVES for sure!

Do you have a fave Project Life kit?
COPYRIGHT COKIE POP PAPER ・POWERED BY BLOGGER