Today is my day to feature the tutorial over at the She's a Sassy Lady blog. This time the focus of today's project is on Disney. At my house - "We Love The Mouse"!
My two angels - Rebekah & Rachel love our trips to Disney World. My project today is called "Disney Passport Mania". Below are instructions to make your own passport.
These passports are great for:
1. Giving as a gift to someone that is going or just got back from Disney. You can even surprise someone by sticking airline tickets to Orlando and Disney park passes in them.
2. Great for holding your Disney mementos such as (park maps, tickets, brochures, etc.)
3. You can also stick this inside a page protector of your Disney album.
Now on to the project instructions:
First, grab an unused scrapbook that you have lying around and remove the white insert out of one of the page protector sleeves. These inserts are somewhat like thinner chipboard. They will serve as the base of our project.
Place your white insert flat on a table. I took this insert from an 8" x 8" album. With my paper trimmer, I cut a strip of red cardstock at 8" x 4". You can adjust this cut depending on what size album that you took your white insert from. Adhere the red strip to your white insert using a Zig pen or other adhesive. Make sure you only adhere the sides and bottom of your red strip. This will serve as our pocket so we need to leave room in the middle to place our Disney mementos in.
Next choose 3 of your favorite Disney patterned paper.
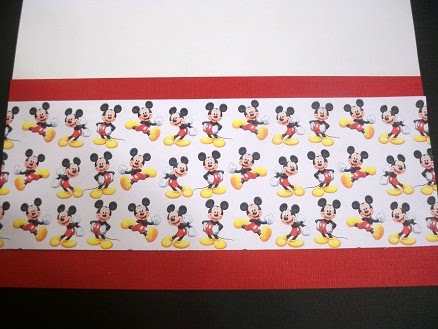
Now cut one of your favorite papers to make another strip. I cut mine at 8" x 3-3/4". Then center and adhere that paper on top of your red cardstock to look like this.
Pick your second favorite Disney patterned paper to cut the last strip. This time cut it at 8" x 2" and adhere it to the top of your white insert like this.
Now we need to type up a cute sentiment or journal spot that will fit the occasion. I typed this up about Rebekah & Rachel. Then I used my Zig pen and adhered it to the left side of my Disney passport. You can use any cute font that you like. If you are looking for cute fonts check out:
http://www.kevinandamanda.com/
Now we need to make a Mickey face cut with the Cricut. For this I used the Disney Mickey Font cartridge and cut Mickey's face at 3". This cut can be found on pages 72 and 74. I also added an "M" to the center of my Mickey Face to dress it up a bit. I then used adhesive to stick this next to the sentiment/journal spot on my passport.

We are almost done. Now we need to add some Disney mementos to our passport. You can stick anything into the red pocket such as Disney brochures, park tickets, park maps, airline tickets, etc.
To finish things off I wanted to add some ribbon. Either red or black ribbon would look great with this project. I decided to go with black sheer ribbon. I just wrapped it around my Disney passport and tied a bow in the center.
And once again here is the finished project
I hope that you enjoyed my Disney Passport tutorial. Please visit the She's a Sassy Lady blog. Sheila and the rest of the Sassy Divas have great tutorials there.
Have a Creative Day!


 Pu
Pu